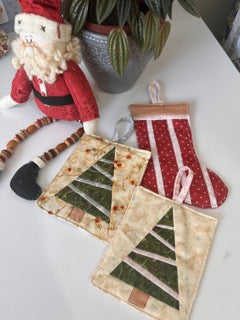
Christmas Decorations
Christmas being a Japanese girl!
Christmas is coming... Oh, this date is really lovely! Even though it's the end of the year and we're all very tired and exhausted, this date fills us with a bit of peace, doesn't it? I also believe that for some people, this date can bring some unpleasant feelings, but perhaps it's an opportunity to reflect and understand why we feel this way and try to do something different from what we've done in all the previous years, right?
As a daughter of Japanese parents, we celebrated New Year's much more than Christmas, especially since my parents are Buddhists, which in itself changes a lot, doesn't it? But I'm Catholic, and I had and still have Christian influences. I love Christmas and everything it represents! I love decorating the house, the spaces, the smell and taste of gingerbread (that cinnamon smell that fills the whole house!), family gatherings, the real meaning of this date and everything else. And since I love decorating the house at this time of year, I took my Christmas fabric scraps and made these Christmas Ornaments using the foundation technique. And I looooved them!!

Foundation Tutorial on Santa's Boot
So, let's make these ornaments? I made them to decorate the tree or any place you want to hang them, but you can use them as coasters, especially on the Christmas tree! Separate the scraps and get to work!
Required materials: Christmas fabric scraps (3 prints), blanket, lining fabric, scissors, printed Christmas Ornament template (PDF) (also on sulfite paper), cutter, ruler and cutting mat.

The pattern has descriptions of letters and numbers. The letters are the fabrics (Fabric A, B and C) and the numbers are the order of how to sew. So we will start with A1 + B1 (red fabric + light pink fabric). Sewing will be done on the lines on the paper side with small stitches, I use stitch 1.5 on the foundations. Place fabrics A and B on the wrong side of the sheet and sew on the line on the paper. 


Once you have sewn the pattern, open the fabric B (you can use an iron, or even your finger). Then you will take fabric A2 and sew it with B1, remembering to always position DCD (right sides together) and behind the pattern, in the same way you did in the previous seam and following the order of the description with the rest until you form the boot. Always sew along the pattern.


Once the boot is complete, we'll set it aside and make the string that we'll use to hang the ornament. Using a 1-inch wide strip, fold both sides of the strip in half, forming a 1/4-inch strip (this string is very narrow). Now with the boot, we'll position the blanket (I used a very thin blanket), the lining on top (with the right side facing up) and then the boot above the lining with the right side facing down.


Sew around the boot, still using small stitches, leaving the top open so you can turn the piece over at the end. After sewing, cut off the excess with scissors. (Here I cut less than 1/4 inch so it would fit better when turning it over). Make some notches in places where there are corners or inward curves, as this makes it easier for the fabric to conform to the shape when turning it over.


Now it's time to remove the paper. That's why we sew with small stitches, so that it's easy to remove the paper used as a foundation base.
Once all the paper is removed, just turn the piece right side out, iron it to make it more flat and then close the boot with the string. Your Christmas decoration is ready! Isn't it beautiful? If you want, watch the video of this foundation tutorial on YouTube .


If you create your own Christmas Ornaments, I'd love to see them! You can tag me on Instagram @taniamogariquilter.
Happy Sewing and Merry Christmas.

1 comment
Bom dia Tania. Adorei a idéia dos enfeites de natal. Náo estou conseguindo baixar o PDF, poderia me ajudar?
Grata.