Rope Handled Tote Bag/Bolsa Alça de Cordão Patchwork - Tutorial
ROPE HANDLED TOTE BAG/ BOLSA ALÇA DE CORDÃO PATCHWORK (18"x 18") - Tutorial

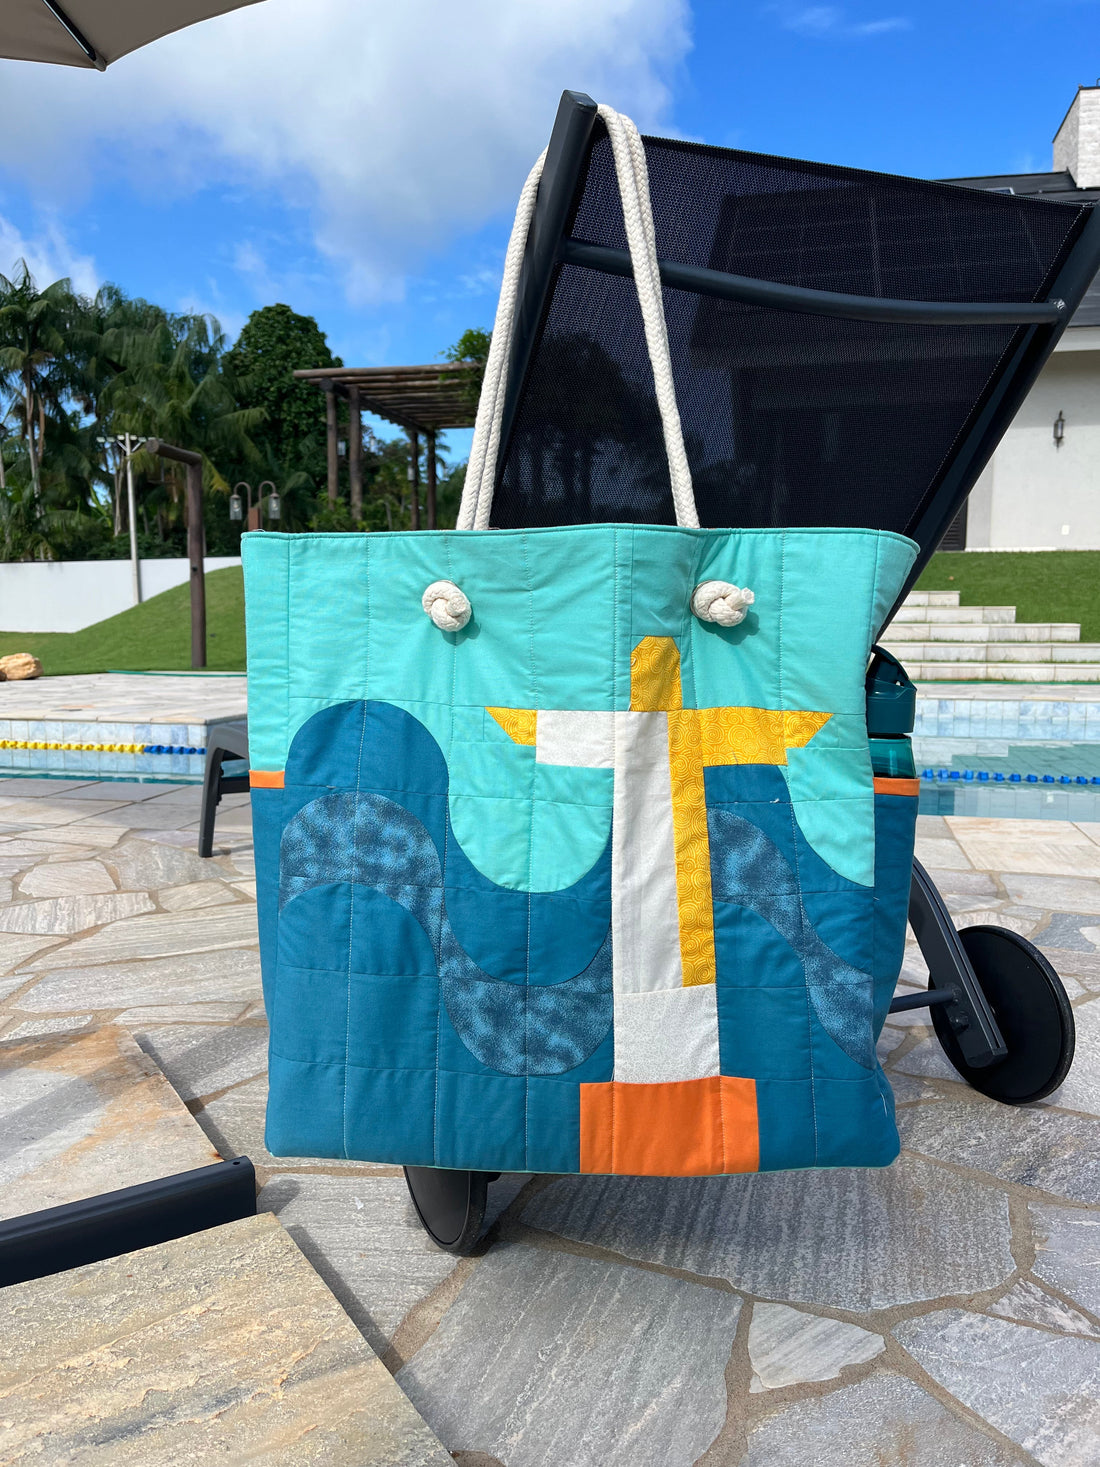
Since my participation in Summer Games Sampler 2024 and designed the block Brazil, I knew exactly what I wanted to make with the block besides the sampler. A perfect tote bag to take to the beach or swimming pool. Isn't it perfect? I think the waves and Cristo Redentor go very well with Summer, sun and water. Over here in Brazil is Summer season now and kids school summer vacation, which means most families spend vacation at the beach. But this tote could be perfect for diaper bag, gym bag, whatever you need as well.
So I've decided to make one for me and I loved it how it turned out. Good size and with a great palette of color, it will be a beautiful and successful tote. So lets go to the tutorial. You will need the Block Brazil pattern that you can shop at the store or just click here! The pattern is available only in English.
Portuguese:
Desde minha colaboração ao Summer Games Sampler 2024 com a criação do bloco Brazil, eu sabia exatamente o que eu queria desenvolver com o bloco além do Summer Games Sampler. Uma bolsa de alça de cordão de praia ou para levar à piscina. Não é perfeito? As ondas e Cristo redentor do bloco combinam demais com verão, sol e água, não é mesmo? Aqui no Brazil estamos na estação verão e agora é férias de verão escolar, ou seja, muitas famílias descem pra praia nesse período! Mas a bolsa é perfeita também para bolsa de bebê, de academia ou para qualquer função.
Assim sendo resolvi fazer uma pra mim e amei o resultado dela. Uma bolsa de ótimo tamanho para carregar todos os pertences da família e com uma combinação de tecido, essa bolsa ficará linda e muito útil. Então vamos ao tutorial. Você precisará do projeto do bloco Brazil disponível na loja ou só clicar aqui! O projeto está disponível apenas em inglês.
MATERIAL


FOR 42" WIDTH OF FABRIC:
- (1) block 18,5" x 18,5" (Block Brazil Summer Games Sampler 2024). Pattern available at the store or just click here.
- 5/8 yard exterior fabric (back, sides and bottom).
- 3/4 yard lining fabric (back, front, sides and bottom).
- 1/4 yard side pockets fabric.
- (2) rectangles 7,5" x 6,5" inside pocket.
- 4 sets of grommets and the tools to apply them.
- 80" of cotton rope for the handles.
- 1 yard of medium or heavy weight interfacing or flexible foam stabilizer.
PARA TECIDO LARGURA DE 1,50m:
- (1) bloco de 18,5" x 18,5" )bloco Brazil Summer Fames Sampler 2024). Projeto disponível na loja ou clique aqui.
- 0,50cm de tecido externo da bolsa (costas, base e laterais).
- 0,50cm de tecido interno da bolsa (costa, frente, laterais e base).
- 0,20cm de tecido bolsos laterais.
- (2) retângulos de 7,5" x 6,5".
- 4 ilhós tamanho grande e ferramenta para colocar.
- 80" de cordão grosso de algodã para alças.
- 0,50cm de manta poly 200 R1 ou R2.
CUTTING
From exterior, cut:
- (1) square 18,5" x 18,5" (back) or Scrappy version see below.
- (3) rectangles 18,5" x 5,5" (bag bottom and sides)
From sides pocket fabric, cut:
- (2) rectangles 14" x 5,5" OR (4) rectangle 7,5" x 5,5" (scrappy pocket sides).
From lining fabrics, cut:
- (2) squares 18,5" x 18,5" (lining front and back)
- (3) rectangles 18,5" x 18,5" (lining sides and bottom)
From the heavy weight interfacing or flexible foam interfacing, cut:
- (2) squares 18,5" x 18,5".
- (3) rectangles 18i,5" x 5,5".
From the inside pocket, cut:
- (2) rectangles 7,5" x 6,5"
From cotton rope:
- (2) ropes of 40".
PS. If you want a scrappy back, the way I did, choose (3) fabrics (A, B and C) and cut:
- (1) rectangle 18,5" x 6,5" (Fabric A)
- (1) rectangle 18,5" x 2,5" (Fabric B) for the back and (2) rectangle 5,5" x 1,5" for the pocket sides.
- (1) rectangle 18,5" x 11"(Faric C)
Portuguese:
Do tecido externo, cortar:
- (1) quadrado 18,5" x 18,5" (costa) or versão scrappy veja abaixo.
- (3) retângulos 18,5" x 5,5" (lateral e base da bolsa).
Dos bolsos das laterais, cortar:
- (2) retângulos 14" x 5,5" OU (4) retângulos 5,5" x 7,7" (parra scrappy pocket sides).
Do bolso interno, cortar:
- (2) retângulos 7,5" x 6,5"
Do tecido interno, cortar:
- (2) quadrados 18,5" x 18,5" (tecido interno da frente e costa).
- (3) rectangles 18,5" x 18,5" (tecido interno das laterais e fundo).
Da manta poly 100 ou 200 (R1 ou R2):
- (2) quadrados 18,5" x 18,5".
- (3) retângulos 18i,5" x 5,5".
Do cordão de algodão, cortar:
- (2) cordas of 40".
PS. Se preferir as costas da bolsa em scrappy, como eu fiz, escolher (3) tecidos (A, B and C) e cortar:
- (1) retângulo 18,5" x 6,5" (Tecido A).
- (1) retângulo 18,5" x 2,5" (Tecido B) para as costas e (2) retângulas 5,5" x 1,5" para bolsas materiais.
- (1) retângulo 18,5" x 11"(Tecido C).
SEWING INSTRUCTION:
MAKE THE TWO POCKET SIDES - FAZENDO OS DOIS BOLSOS DAS LATERIAIS.
- For the pocket side, grab the (2) rectangles 14,5" x 5,5" , fold each in half and leave aside. If you are making scrappy pocket sides like mine, place (1) rectangle 5,5" x 1,5" (fabric B) RST with (1) rectangle 7,5" x 5,5" (scrappy pocket sides) set your seams and then place this unit RST to another (1) 7,5" x 5,5", set your seams and press the both seams to one direction, fold in half and ser aside. Make (2).
- Para as bolsas laterais, pegue (2) retângulos 14,5" x 5,5", dobre ao meio e deixe de lado. Se você estiver fazendo com detalhe no viés do bolso, peque (1) retângulo 5,5" x 1,5" (tecido B) DCD (1) retângulo 7,5" x 5,5"costure e passe ambos viés no mesmo sentido, dobre ao meio e passe o dois viés no mesmo sentido conforme a figura abaixo. Fazer (2).


2. Topstitch along the fold for the pocket top edge and top bias edge for the scrappy version. And set aside the pockets.
2. Esse uma costura na parte dobrada que faz o viés da borda do bolso. Deixe de lado os bolsos.

MAKE THE EXTERIOR BACK (SCRAPPY VERSION) - FAZENDO A PARTE EXTERNA DAS COSTAS (VERSÃO SCRAPPY).
- Place the (1) rectangle 18,5" x 6,5" (fabric A) RST with (1) rectangle 18,5" x 2,5" (fabric B) set your seams and press towards fabric B then place the (1) 18,5" x 11" (fabric C) RST with this unit, set your seams and press towards fabric C.
- Pegue (1) retângulo 18,5" x 6,5" (tecido A) DCD com (1) retângulo 18,5" x 2,5" (tecido B) costure e passe viés para tecido B e então pegue (1) retângulo 18,5" x 11" DCD com essa unidade, costure e passe o viés para tecido C.


- Let's baste and quilt all the bag parts: the front and back pieces, sides and bottom pieces. Take the Brazil block and baste with the batting and backing fabric chosen, use your preferred method of basting. Quilt as desired. Do this with the back piede, sides and bottom pieces.
- Vamos sanduichar e quiltar as partes da bolsa: parte da frente e costas, laterais e o fundo. Pegue bloco Brazil e sanduichar com manta e forro escolhido, fazer isso com a parte das costas, laterais e fundo. Faça quilting de sua preferência.


2. After basting and quilting all the parts, sew 1,8" around the edge of every piece to make the assembling part easier.
2. Após sanduíchado e quitado todas as partes, passe uma costura de 1/8" por toda borda de cada parte para facilitar no momento da junção das partes.

ATTACHING THE EXTERIOR POCKETS TO THE SIDE PIECES - COLOCANDO BOLSOS NA LATERAL DA BOLSA.
- Place (1) pocket unit over the quilted side piece, align it over the quilted piece correctly and pin. Sew 1/8" the pocket and the side piece together. Repeat the same to the other side piece.
- Pegue o bolso externo preparado e coloque sobre a unidade da lateral quitada alinhando corretamente. Com uma margem de 1/8" costure ambas partes. Repita o mesmo com outra lateral da bolsa.

ASSEMBLE THE BAG EXTERIOR - MONTANDO A PARTE EXTERNA DA BOLSA
- On the back of the bag bottom piece, mark 4 dots in the corners, 1/4" away from the edges. Pin and stitch the bag bottom to the bottom edge of the front or back piece, right sides together.
1. Do lado avesso da base do bolso quitado, faça 4 marcas nos cantos, de 1/4" da borda. Alfinete e costure essa base com a parte frontal ou das costas, direito com direito.

2. Repeat to sew the other side of the bag bottom to the remaining front or back piece. Press the seams open.
2. Repita com outro lado da base do bolso com a outra parte frontal ou costa. Passe viés aberto.

3. Mark dots 1/4" away from the lower corners only of the side pieces. Sew the side pieces to the bag front, sewing from the top edge to the dot. Press the seams open.
3. Marque pontos de 1/4" da margem das laterais do bolso. Costure as laterais com a parte frontal da bolsa, iniciando do topo até a marca de 1/4". Passe o viés aberto.


4. Fold the bag over and pin the sides to the back of the bag. Once again sew from the top edge to the dot. Repeat on the other side and press the seam open.
4. Vire a bolsa e alfinete o outro lado com a parte das costas da bolsa. Mais uma vez costure do topo até a marca. Repita do outro lado e passe viés aberto.

5. To finish the bottom side edges, fold the bag flat with the bottom piece against one of the sides and the edges aligned. Sew the 1/4" seam from dot to dot. Repeat the other side.
5. Para fechar a base da bolsa, segure a bolsa esticada sobre um dos lados e as margens alinhadas. Costure 1/4"de margem de uma marca à outro. Repita do outro lado.

6. Turn your beautiful bag right side out and press gently.
6. Vire sua bolsa do lado direito e passe com cuidado.
MAKING THE BAG LINING - FAZENDO A PARTE INTERNA DA BOLSA.
Inside Pocket - Bolso Interno
- For the inside pocket, pin the 7,5" x 6,5" rectangles right sides together and sew around all of the edges. Leave a 4"opening for turning on the bottom. Clip corners, turn, press and topstitch along the top edge.
1. Para bolso interno, alfinete o retângulo 7,5" x 6,5" DCD e costure ao redor da margem, deixando abertura de 4"para desvirar. Corte as pontas, vire, passe o ferro e costure bem rente à margem.


2. Pin the pocket in one of the lining panels. the pocket should be centered. Stitch around the sides and bottom of the pocket with 1/8" seam allowance (this will close the opening).
2. Alfinete o bolso na parte das costas do forro, centralize e costure os lados e a base do bolso com 1/8" de margem (isso fechará a abertura).

ASSEMBLING THE BAG LINING - MONTANDO A PARTE DO FORRO DA BOLSA.
- The assembling of the lining bag will be the same of the exterior bag. First sew lining bottom to the front and back lining, then the lining sides and finally closing the lining bottom sides, BUT when sewing the bottom to the front or back, leave a 6" opening for turning the back right side out.. All with 1/4" seam allowance. Press the lining but do not turn it right side out.
1. Para montar o forro da bolsa, irá fazer da mesma forma que a parte externa da bolsa. Primeiramente irá costurar a base do forro com a parte da frente e das costas do forro, e então as laterais e por fim os dois lados da base do forro fechando o forro da bolsa, MAS quando costurar a base do forro com a parte da frente ou das costas, deixe uma abertura de 6" para poder desvirar mais tarde. Todos com margem de 1/4" de costura. Passe o viés aberto mas não vire o forro ainda.

SEW THE LINING TO THE EXTERIOR - COSTURANDO FORRO COM A PARTE EXTERNA DO BOLSO.
- Place the bag exterior (right side out) inside the lining with the right sides together, pin all the way around the top edge.
1. Coloque a parte exterior da bolsa por dentro do forro direito, direito com direito, alfinete toda a borda das duas partes.

2. Sew all the way around the top edge with 1/4" seam allowance.
2. Costure todo ao redor da borda da bolsa com margem de 1/4".
3. Turn the bag right side out through the opening in the lining. Press the raw edges at the opening to the inside and hand or machine-sew the opening closed.
3. Vire a bolsa para direito. Passe o ferro da margem de costura da abertura para dentro e costure a mão ou na máquina essa abertura.

4. Press the top edge of the bag and topstitch 1/4” from the edge all the way around.
4. Passe o ferro o topo da bolsa endireitando a margem e faça uma costura de 1/8" em volta da borda da bolsa.

ADDING THE GROMMETS AND ROPE - COLOCANDO ILHÓS E ALÇA DE CORDA.
- Use the larger half of one grommet to draw a circle at the top of the bag, in one of the curve corners. The grommet should be about 2" from the edges. Cut out the circle through both layers. It helps to make a hole with your seam ripper and then cut around with little scissors. You will need the anvil and the setter, those are extra tools for it. I recommend size around 1" for the grommets.
- The setter is positioned on the back side of the grommet and struck with a hammer. So place the larger half of the grommet through the hole on the front of the bag, and place the smaller half of the grommet over it on the inside of the bag. On a hard surface (such as the floor) place the anvil under the grommet on the bottom (the front of the bag) and position the setter tool on top. Strike hard with a hammer. It’s okay to strike not-so-hard at first to see how much force is necessary to bend the metal and set the grommet. Just keep pounding until the grommet looks perfect. Repeat until you have 2 grommets for each bag handle.
1. Para ilhós temos uma vantagem aqui no Brasil. Muitas lojas de aviamento fazem a colocação desses ilhós para nós, basta você escolher o tamanho do ilhós e marcar exatamente onde você quer na bolsa. Atenção, para tamanho do ilhós escolha de acordo com a grossura da corda que você irá usar para alça. Minha sugestão que seja grossa devido ao tamanho dessa bolsa. Ela é uma bolsa grande.
2. Nesse caso eu usei ilhós do tamanho de 1". Coloque aprox. 2" da borda superior da bolsa e centralize bem os dois ilhós.

3. Cut two 40” lengths of rope. If the shop worker placed tape on the end of your rope remove it before you measure. Push the end of one rope section from the inside of the bag to the outside and tie a knot. Push the other end of the rope section through the remaining grommet on the same side of the bag and make a knot. Fray the ends, if desired and trim the strings so they are even. Repeat for the other handle and you are done!
3. Corte duas cordas de 40" de comprimento. Ao comprar você vai reparar que as pontas sempre ficam com um adesivo para não desmanchar, então ao cortar sempre coloque esse adesivo nas pontas. Insira uma ponta no ilhós, faça um nó e então faça outro nó do outro lado, deixando os nós na parte de fora da bolsa. Faça a mesma coisa com outra alça e pronto, sua bolsa está finalizada!

All done! I'll be very happy to share your Cord Handled Tote Bag in Instagram if you tag me @taniamogariquilter so I can see! Hope you enjoy it as much as I am this Summer vacation.
Pronto! Ficarei muito feliz em compartilhar sua Bolsa de Alça em Cordão no Instagram se me marcarem @taniamogariquilter para poder vê-lo! Espero que goste tanto quanto eu estou adorando essa bolsa nesse verão!
1 comentário
Eu amei, já vou começar a fazer e muito obrigada por compartilhar essa lindeza e principalmente seus conhecimentos!!